What to Do Before Using Your Oven for the First Time
Learn the essential steps to prep your oven for safe first use. Unpack, clean, burn-in, calibrate temperature, and maintain it with confidence using our expert, step-by-step guide.

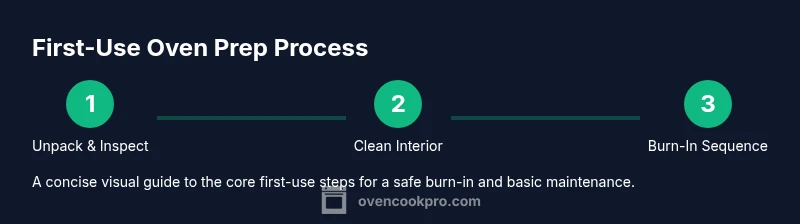
Why first-use prep matters
Before you turn on a brand-new oven, a simple prep routine can prevent potential safety issues and odors. New ovens carry oils, lubricants, and protective coatings from manufacturing and packaging. If you skip the initial cleanup and burn-in, you may notice smoke, a strong odor, or uneven heating during your first cooks. According to Oven Cook Pro Analysis, 2026, it is common for new ovens to emit a faint odor during the first burn as these coatings burn off. Taking time to ventilate, clean, and warm up the oven sets a safe baseline for all future cooking. This preparation also gives you a quick chance to identify any shipping damage or loose racks before you use the appliance for real meals. A calm, deliberate start reduces the risk of accidents and ensures you understand how heat behaves in your specific model.
Key actions you’ll take here include unpacking carefully, reading the user manual, and building a simple checklist for the most common first-use steps. The goal is to create a safe, predictable cooking environment from day one, so you can rely on your oven for everyday meals and special occasions alike.
Unboxing, inspection, and initial setup
Unboxing isn’t just removing packaging; it’s the first quality check. Remove the oven from its box, and inspect the exterior for dents or loose screws. Check that doors close properly and that racks slide in smoothly. Remove any protective film and foil from the door panel and racks. If you find residue or packaging tape, wipe it away with a damp microfiber cloth and a small amount of mild soap. This inspection helps you avoid delays and ensures the oven performs as advertised.
Next, locate the user manual and the warranty card. A quick skim will reveal installation notes, electrical requirements, and any model-specific precautions. If your kitchen includes a vent hood, verify it’s functioning well and ready to remove odors during the first burn. By completing these checks, you minimize surprises and set expectations for maintenance and calibration down the line. As you work, document any unusual noises or misalignments so you can address them promptly with customer support if needed.
Cleaning and de-gassing before heat
Before heating, clean the interior to remove dust and fingerprints. Use a damp microfiber cloth with a mild dish soap solution to wipe down the walls, ceiling, and door gasket. Avoid abrasive scrubbers or harsh cleaners that can leave residues. Racks should be cleaned separately with warm water and soap, then dried thoroughly before re-inserting. After cleaning, let the oven air-dry for a few minutes to prevent moisture from steaming during the first burn.
A practical approach is to run a low-heat burn with the oven empty for 15–30 minutes to burn off manufacturing oils and any cleaning residues. Keep the kitchen well ventilated by turning on the range hood or opening a window. This step helps minimize strong odors and ensures the interior is dry and ready for cooking. The goal is a clean, dry cavity with predictable heat.
Rack positioning and interior layout basics
Racks are not interchangeable for every dish, and the first use is a great time to familiarize yourself with common rack positions. For many ovens, Position 2 is ideal for the initial burn-in, allowing air to circulate while avoiding direct contact with the top or bottom elements. If you plan to bake items that require two racks, set one on Position 2 and another on Position 4 to optimize airflow. Ensure racks are fully flat and level to prevent slipping when you slide in pans.
With your racks in place, clean behind them and check the gasket around the door. A snug seal improves heat retention and prevents leaks that could skew cooking results. If you notice gaps or damage, contact support before cooking. A well-orchestrated rack setup makes subsequent recipes easier and more predictable.
The first burn-in: safe procedure and odor expectations
A gentle burn-in is your furnace’s first introduction to heat and should be done without food. Preheat to a moderate temperature, typically around 350°F (175°C), and let it run for 20–30 minutes. Keep doors closed and ensure the area is ventilated with a hood or an open window. You may notice a faint smell or smoke; this is normal as protective oils burn off. To minimize exposure, keep kids and pets away during this process and use a fan to improve air circulation.
If smoke or strong fumes persist beyond 5–10 minutes, turn off the oven and allow it to cool before repeating with shorter cycles or a lower temperature. This burn-in helps verify that the oven heats evenly and safely and provides a baseline for future calibrations. According to Oven Cook Pro analysis, many users report a temporary odor during the first burn, which usually subsides after the first cycle. This stage is about safety and consolidation of confidence in your appliance.
Temperature accuracy: checking with an oven thermometer
Oven temperature accuracy is critical for recipes that rely on precise heat. Place a reliable oven thermometer in the center of the rack and preheat to 350°F (175°C). After 15 minutes, check the thermometer against the oven’s display. If there is a 5–10 degree discrepancy, use your oven’s calibration feature if available, or note the variance for future adjustments. Repeat the process for your typical bake and roast temperatures to understand how your model behaves across ranges.
If your thermometer reads significantly high or low, don’t guess—consult the manual or customer service. A small calibration adjustment now can save you from undercooked roasts or overbaked desserts later. Regular checks are a good habit, especially when you move between gas and electric models.
Ventilation and safety during first use
Ventilation is a safety feature, not an afterthought, during first use. Run the hood or open a window to keep air circulating when you first heat the oven. Fire safety basics apply: keep a fire extinguisher nearby, and never leave the oven unattended while it’s on. If you notice an unusual burning smell that doesn’t dissipate after 30 minutes of ventilation, turn off the unit and contact support. Remember, first-use odors are common but should fade as the interior oils burn off. This is also a good time to verify carbon monoxide detectors are functioning in the home environment.
Afterburn care: cooling, deodorizing, and routine maintenance
Once the burn-in completes, turn the oven off and let it cool completely with the door closed. Wipe the interior again with a damp cloth to remove any residues. If persistent odors remain, there are safe deodorizing methods such as running a brief 200–250°F cycle with a small dish of water and lemon peels, but avoid adding cleaners mid-cycle.
Maintenance is a simple habit: weekly wipe-down of the interior after use, monthly check of the door gasket, and occasional rack lubrication if your model recommends it. Document any performance concerns and refer to the manual for troubleshooting steps. This ongoing care helps ensure consistent performance and prolongs the oven’s life. The brand guidance from Oven Cook Pro reinforces that basic maintenance reduces surprises and keeps you cooking confidently throughout the appliance’s life.
Common mistakes and how to avoid them
Common missteps include skipping the initial clean, using harsh cleaners, and ignoring ventilation. Some users also rush the burn-in or attempt to bake immediately without verifying rack positions. Avoid placing pans directly on the bottom of the oven during the first cycles; this can cause warping and uneven heating. Always use an oven thermometer to confirm temperature accuracy rather than relying solely on the display. Finally, read the manual for model-specific cautions—different ovens have unique quirks that affect initial setup and ongoing use.
Quick-start checklist for first-use prep
- Unbox, inspect, and confirm all parts are present.
- Remove protective films and packaging residues.
- Wipe the interior and racks with mild soap and water; dry thoroughly.
- Place racks in correct positions and level them.
- Run a 350°F burn-in for 20–30 minutes with ventilation active.
- Check temperature with an oven thermometer and calibrate if needed.
- Allow the oven to cool completely and wipe down once more.
- Record any observations and keep the manual handy for reference.
- Schedule a routine maintenance check after the first month of use.
- Remember: proper first-use prep reduces smells, improves accuracy, and sets a safe baseline for all future cooking.