What Amp Is Needed for an Oven: A Practical Home Guide
Learn typical amperage needs for residential ovens, how to read nameplates, and how to plan a safe, code-compliant circuit with Oven Cook Pro.

Understanding Amperage Basics for Ovens
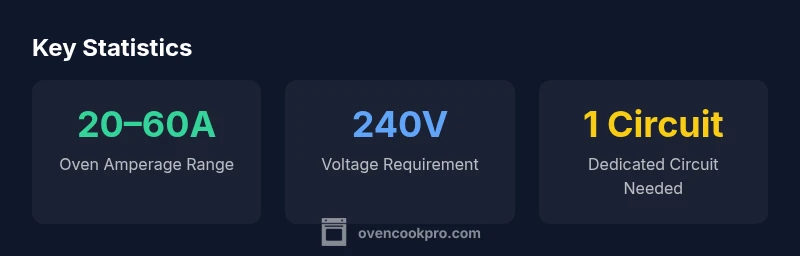
Amperage (amps) is the current the oven draws when it operates. For appliances like ovens, amperage is governed by voltage and wattage, but the practical takeaway for most homes is: you need a dedicated circuit that can safely supply the oven without overloading other devices. According to Oven Cook Pro, the installation environment, wire gauge, and service panel capacity all influence the final amperage rating listed on the nameplate. In 2026, many ovens emphasize energy efficiency, which can subtly affect how they draw current, especially on startup or during peak operation. If you’ve inherited an older kitchen, you may see different amperage needs depending on the wiring available. The safest path is to verify the exact requirement on the appliance label and consult a licensed electrician for any circuit upgrades. A properly sized circuit reduces the risk of nuisance trips and improves bake and roast performance.
How to Locate Your Oven’s Amperage
The first step is to find the nameplate on the oven. This label, usually near the junction box or back panel, lists the voltage and current (in amperes) the appliance demands. For most residential ovens, you’ll be looking for a 240V specification and an amp rating (for example, 30A, 40A, or 50A). The installation manual confirms the required wire gauge and breaker size. If you’re replacing an older oven, ensure your service panel has space for a dedicated circuit and that the wiring meets current code requirements. In some cases, new installation may require a larger breaker (often 40A or 50A) to accommodate added features, but always defer to the nameplate. If you’re unsure, a professional electrician can read the specs and translate them into a safe, compliant setup.
Reading the Nameplate and Specs: A Practical Guide
Nameplates contain essential information such as voltage, amperage, phase, and sometimes wattage. The amperage tells you the minimum circuit rating needed to operate the oven safely. On 240V systems, amps are a direct indicator of current draw and are influenced by elements like convection fans, bake temp, and self-clean modes. Always cross-check the amperage with the model’s installation manual and the wiring diagram. Keep in mind that some ovens have different modes (e.g., self-clean or high-heat broiling) that temporarily spike current; this is why a dedicated circuit with an appropriate breaker matters. If the label shows a value at the upper end of typical residential ranges, ensure the wiring size and breakers align with that specification.
Common Scenarios: Wall Ovens, Double Ovens, and Ranges
A single wall oven typically requires a dedicated 240V circuit sized to its amp draw, while a double wall oven may demand a higher amp rating or two separate circuits depending on installation. Electric ranges (which include a cooktop and oven in one unit) usually pull more total current and commonly require a larger breaker and heavier gauge wire. In practical terms, you should plan for a circuit that can comfortably supply the oven’s peak demand without starving it during preheating or self-cleaning cycles. The exact amperage depends on the unit’s wattage and efficiency. When upgrading, compare the model’s requirements to your home service capacity to avoid overloading the panel.
Planning Safe, Code-Compliant Installations
Code-compliant installs start with a dedicated circuit that’s never shared with standard lighting or small appliances. The installer should verify service panel capacity, wire gauge (e.g., copper conductors in adequate sizes), and proper breaker rating. Look for professional citations in your jurisdiction and ensure all wiring follows the National Electrical Code (NEC) or your local equivalent. If you’re moving to a higher amperage than your current panel can safely handle, you may need service panel upgrades, which require coordinated work from an electrician and possibly your utility. Always obtain a permit if required by your locality and schedule a complete inspection to confirm compliance.
Upgrading Circuits: What to Expect
Upgrading an oven circuit typically involves running new conductors, installing a new breaker, and potentially upgrading the service panel. The scale of the upgrade depends on the oven’s amperage rating and whether you’re adding a second oven or upgrading to a more capable range. A licensed electrician will calculate load, verify panel capacity, and ensure grounding and bonding meet code requirements. Expect a safety-first approach: de-energize the area, use proper PPE, and verify there are no live circuits during work. Budget for both materials (cable, conduit, breakers) and labor, and get a detailed quote before starting.
Maintenance and Long-Term Considerations
Once installed, maintain a clean, accessible electrical space around the oven. Periodically inspect the junction box for signs of heat or arcing, and ensure the cord and plug (if applicable) show no wear. If you notice frequent breaker trips, buzzing noises, or heat on cabinet surfaces, stop using the oven and call a professional. Over time, as your kitchen evolves with more high-demand devices, reassess whether your service panel can comfortably handle peak loads during family gatherings. Proactive checks can prevent emergencies and prolong appliance life.