How Long to Oven Cook Ham: A Complete Guide
Learn how long to oven cook ham with safe temperatures, per-pound timing, resting, and practical tips from Oven Cook Pro to ensure juicy, safe results.

According to Oven Cook Pro, heat ham in a preheated 325°F oven until the internal temperature hits 140°F for pre-cooked or 145°F for raw, then rest for 10 minutes. Plan roughly 10–15 minutes per pound for pre-cooked, 18–23 minutes per pound for raw, with thermometer verification for best results.
Understanding Why Temperature Determines Ham Quality
Temperature is the most reliable signal of doneness for ham because color and size can be misleading. For baked ham, you typically start with a preheated oven at 325°F. If the ham is pre-cooked, you are primarily heating through and aiming for a safe warm temperature, while raw ham needs to reach a higher internal temperature to be safe to eat. Oven Cook Pro analysis shows that relying on time alone can lead to overcooked, dry meat or under-heated centers. Use a probe thermometer that can stay in the meat (but not touching bone) while cooking, allowing continuous readings. In practice, you’ll notice that small differences in oven performance or pan setup can affect how quickly the center warms. A gentle, steady heat yields juicier results than a rushed, high-heat blast. This approach reduces guesswork and helps you serve ham that’s evenly warmed through with the right texture. Resting briefly after cooking also helps redistribute juices for more consistent slices.
Prepping the Ham: Thawing, Trimming, and Glaze
Start by thawing your ham completely in the refrigerator if it's frozen. Don’t rush thawing at room temperature. Remove packaging, pat dry, and decide whether you want glaze. If glazing, mix your glaze (a balance of sweet, salty, and tangy elements works well). Coat the ham or brush on glaze during the last part of cooking to avoid burning sugar. Place the ham on a rack in a sturdy pan; add a few tablespoons of water or broth to the bottom to keep moisture and catch drips. Trimming excess rind is optional; leaving a thin fat cap helps flavor while basting. Use kitchen tongs to handle the ham safely, and keep raw meat separate from items for ready-to-eat foods. If you’re glazing, consider using a glaze that complements the meat’s natural flavor profile—hints of honey, mustard, or citrus pair well with many hams.
Oven Settings and Tools You’ll Need
Set your oven to 325°F and preheat well before the ham goes in. A conventional oven works fine; if you’re using a convection oven, reduce the temperature by about 25°F or monitor the center temperature closely because fan-assisted heat can cook a bit faster. Gather essential tools: a shallow roasting pan with a rack, a meat thermometer, a carving knife and board, and foil for tenting. Keep a basting brush handy for applying glaze if using. Place the ham with the thickest part facing the center of the oven for even heating. If you expect a long cook time, use an oven-safe thermometer with an alarm so you’re alerted when the target temperature is reached. A light glaze or a fan-assisted convection bake can help with browning, but avoid burning sugary glazes by checking color frequently.
Step-by-step Timing Guidelines by Ham Type
Here are practical timing guidelines to manage expectations. For a fully cooked ham (already cured and ready-to-eat), bake at 325°F until the center reaches about 140°F. For a raw, fresh ham, plan for the center to reach about 145°F. Tight control is easier with a probe thermometer rather than relying on time alone. Start checking the temperature near the lower end of the expected window, then go in small increments until you hit the target. If you’re glazing, apply during the last 15–20 minutes of cooking to prevent the glaze from burning. The total time depends on weight and the oven’s performance, which is why thermometer feedback is essential. Expect longer times in larger cuts; smaller packages heat through more quickly with less risk of dry edges. For example, a 6–8 pound fully cooked ham may require roughly 60–90 minutes; a raw ham of similar size might need 105–135 minutes when baked at 325°F.
Common Mistakes and How to Avoid Them
Overcooking dries ham; undercooking compromises safety. Avoid hot ovens or high heat at the start; instead, use steady, moderate heat. Do not forget to let the ham rest after removal; rest for 10–15 minutes to redistribute juices. If glazing, don’t apply too early or too aggressively, and consider finishing with a light glaze at the end to prevent burning. Also avoid piercing the meat with the thermometer repeatedly; insert once and let it read. If your pan lacks a rack, the bottom of the ham sits in fat, leading to uneven heat; elevate the meat so air can circulate. For sugar-based glazes, keep a close eye at the end of cooking to avoid scorching. Finally, refrigerate leftovers promptly and reheat safely.
Resting, Carving, and Serving Juicy Ham
When the ham reaches the target temperature, remove it from the oven and tent loosely with foil for 10–15 minutes. Resting allows juices to redistribute, which makes the slices more tender and juicy. Carving should be done against the grain in thin, even slices; a sharp carving knife helps reduce tearing. If you planned a glaze, re-warm the glaze briefly and serve alongside the ham for dipping. For a warm, inviting presentation, slice just before serving and arrange on a warmed platter. Proper resting and carving are often the difference between a ham that looks good and one that tastes exceptional.
Tools & Materials
- Oven(Preheated to 325°F before inserting ham)
- Heavy roasting pan with rack(Elevates ham to promote even heat)
- Meat thermometer / probe(Monitor internal temp without opening oven)
- Aluminum foil(Tent ham or protect glaze near end)
- Carving knife and carving board(For clean slices)
- Basting brush (optional)(Apply glaze evenly)
- Roasting pan liquid (water or broth)(Adds moisture and catches drips)
- Oven mitts(Safe handling of hot pan)
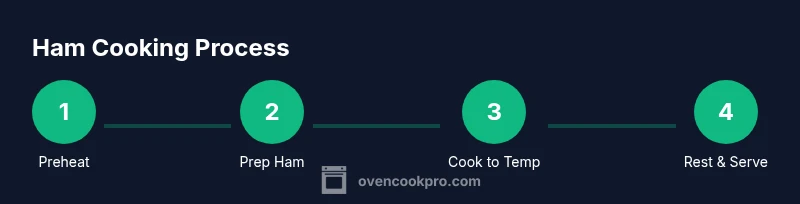
Steps
Estimated time: 60-120 minutes
- 1
Preheat oven and gather equipment
Begin by turning the oven to 325°F and letting it preheat fully. Gather the roasting pan with rack, thermometer, carving gear, and any glaze you plan to use. This setup ensures even heating and accurate temperature readings.
Tip: Place a thermocouple or remote thermometer probe near the ham for continuous readings. - 2
Assess ham type and thaw if needed
Determine whether your ham is fully cooked or raw. If frozen, thaw completely in the fridge before cooking to ensure even heat throughout the center. Prepare glaze ingredients if you plan to use one.
Tip: Thawing in the fridge prevents surface bacteria growth and ensures uniform cooking. - 3
Prepare the pan and optional glaze
Place the ham on the rack in the roasting pan. Add a small amount of liquid to the pan for moisture and to catch drippings. If using glaze, whisk it so it glazes smoothly and won’t burn quickly.
Tip: Dry rubs or light seasoning can be added before glazing for extra flavor. - 4
Insert thermometer and set target temps
Insert the thermometer into the thickest part of the ham, avoiding bone. If glazing, plan to apply glaze during the final 15–20 minutes to prevent over-browning. Set your target internal temperatures: 140°F for pre-cooked, 145°F for raw.
Tip: Keep the thermometer in place and monitor without opening the oven repeatedly. - 5
Bake and monitor temperature
Bake with occasional checks; plan to adjust time based on meat size and oven performance. If the center isn’t close to target, continue cooking in 5–10 minute increments. If browning too fast, tent with foil.
Tip: Avoid peeking too often; each opening lowers the oven temperature and extends cook time. - 6
Apply glaze at the end (optional)
Brush on glaze during the last 15–20 minutes if you want a glossy finish. Monitor closely to prevent burning sugar in the glaze. The glaze should heat enough to set, not burn.
Tip: Save a small portion of glaze to serve with the carved slices for extra flavor. - 7
Rest, carve, and serve
When the ham hits the target temp, remove it from the oven and tent with foil for 10–15 minutes. Resting helps redistribute juices. Slice against the grain for tenderness and serve promptly.
Tip: Carve in thin, even slices for maximum tenderness and ease of serving.
Questions & Answers
What is the safe internal temperature for ham?
For pre-cooked ham, heat to 140°F. For raw ham, reach 145°F. Always rest the meat for at least 3 minutes before serving. Use a reliable thermometer to verify the temperature at the thickest part.
Heat pre-cooked ham to 140 degrees and raw ham to 145, then rest before serving.
Can I glaze ham while it’s cooking?
Yes, glaze during the last 15–20 minutes to prevent sugar from burning. Apply evenly and watch the color closely.
Yes, apply glaze in the last 15–20 minutes and monitor closely.
Is convection better for ham?
Convection can cook a bit faster and brown more evenly. If using convection, lower the temperature by about 25°F or monitor the center temperature closely.
Convection can speed things up; lower the temp a bit and keep an eye on the center.
Can I cook a frozen ham in the oven?
Cooking from frozen is not ideal. If unavoidable, expect longer cooking times and verify doneness with a thermometer. Plan to thaw thoroughly for even heating.
Cooking from frozen is not ideal; thaw if possible and verify temperature carefully.
What if I don’t have a thermometer?
A thermometer is strongly recommended. Without one, you risk under- or overcooking. Consider purchasing an inexpensive probe for best results.
A thermometer is highly recommended for safety and accuracy.
How should I store leftovers?
Store leftovers promptly in the refrigerator within two hours of cooking. Reheat to at least 165°F before serving again, and refrigerate or freeze any unused portions.
Cool leftovers quickly and reheat to 165 degrees before eating again.
Watch Video
Main Points
- Check internal temperature, not time alone.
- Preheat and use a rack for even heating.
- Rest before carving for juiciness.
- Glaze in the final minutes to avoid burning.