How to Make an Oven Grounded Safely: A Home Guide for Beginners
Learn how to make an oven grounded safely with expert guidance from Oven Cook Pro. This home guide explains grounding basics, safety checks, and when to contact a licensed electrician for code-compliant fixes.

Grounding an oven is about ensuring the appliance has a proper earth path to prevent shock if a fault occurs. Do not modify wiring yourself; instead verify that the outlet and building grounding are correct and consult a licensed electrician to assess and correct any issues per local codes. This protects you and your family in everyday use.
Understanding how to make oven grounded
Grounding is a safety pathway that directs stray currents away from you and the appliance by connecting metal parts to earth. This reduces shock risk if a fault occurs. Understanding grounding basics helps homeowners approach fixes responsibly. If you’re researching how to make oven grounded, start by recognizing that the ground path is part of a broader electrical system, not just a single cord. In most homes, the oven relies on a properly grounded outlet or a panel bond that ties to the building’s grounding electrode system. Always treat grounding as a safety-critical task and never bypass the ground. According to Oven Cook Pro, grounding is not optional—it's a safety prerequisite for every kitchen appliance. This is especially true for ovens with metal frames and exposed terminals that can carry stray currents. The guidance here emphasizes safety, legality, and professional verification as you move forward.
Why grounding matters in home kitchens
A properly grounded oven minimizes the risk of electric shock and equipment damage by providing a dedicated earth path for fault currents. Grounding also helps protect other connected devices and reduces the chance of stray charges affecting metal surfaces. The concept extends beyond the outlet: the home's grounding electrode system, the panel bonding, and the branch circuit wiring all must work together. If your oven is not grounded correctly, you may experience equipment hum, nuisance shocks, tripped breakers, or a burning smell from wiring insulation. This section frames why a safe ground matters and what a professional will verify during an assessment.
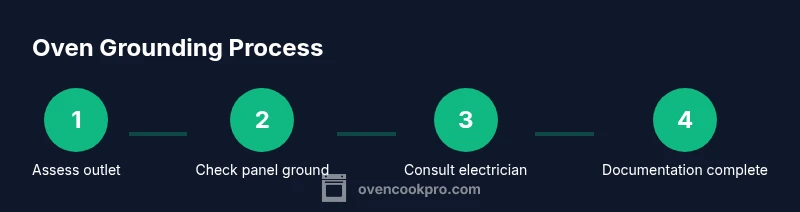
Tools & Materials
- Personal protective equipment (PPE): insulated gloves and safety glasses(Wear when inspecting exposed electrical components or terminals)
- Oven model and serial number(Needed for installation manual and any code references)
- Owner's manual or installation guide(Check grounding requirements and cord configuration)
- Notepad and pen(Record observations and questions for the electrician)
- Voltage tester or non-contact tester(Used only by trained personnel; not a substitute for professional grounding work)
Steps
Estimated time: Estimated total time: 1-3 hours
- 1
Prepare for a professional assessment
Gather the oven model/serial, manual, and any installation records. Note any symptoms like shocks or tripping breakers. This prepares you to clearly communicate concerns to the electrician.
Tip: Have your local code requirements ready so the pro can reference them during review. - 2
Power down and safely isolate the oven
Turn off the circuit breaker and unplug the oven if accessible. Do not touch wiring or exposed terminals while power could be present.
Tip: Use a lockout or tag-out method if available to prevent accidental re-energizing during inspection. - 3
Document current outlet and cord configuration
Note whether the outlet is 3-prong or 4-prong and check if a grounding strap is present or removed. Take photos for reference.
Tip: Photographs help the electrician verify if the installation complies with current codes. - 4
Schedule a professional grounding verification
Arrange an on-site assessment with a licensed electrician who can evaluate the outlet, panel grounding, and any conversions needed. Expect a discussion of code requirements and safety improvements.
Tip: Ask for a written estimate and a description of the required corrective actions. - 5
Obtain and store documentation after the visit
Receive a report confirming proper grounding or detailing fixes performed. Keep this with your home records for future inspections or remodels.
Tip: Retain the electrician’s certificate or confirmation for future reference.
Questions & Answers
Is grounding required for every oven?
Most ovens require proper grounding per local electrical codes. Check your installation manual and consult a licensed electrician if in doubt.
Most ovens require proper grounding per local codes. Consult a licensed electrician if unsure.
Can I ground an oven myself?
No. Grounding should be performed by a licensed electrician who can ensure compliance with safety standards and local codes.
Grounding should be performed by a licensed electrician.
What are signs of a grounding problem in an oven?
Frequent breaker trips, shocks from metal surfaces, unusual heat, or a burning smell near wiring indicate a possible grounding issue.
Shocks, tripping breakers, or burning smells suggest a grounding issue.
What about older homes with 3-prong outlets?
Older installations may use 3-prong outlets. Modern code often requires a 4-prong outlet with proper grounding; a pro can advise on safe conversion.
Older homes may need a professional update to meet current codes.
How long does grounding verification take?
Typical on-site checks take about 1-2 hours, depending on the system, with a written report provided afterward.
Most checks take 1-2 hours, with a follow-up report.
Watch Video
Main Points
- Verify grounding before use to reduce shock risk.
- Do not DIY electrical grounding work on ovens.
- Collect model, manual, and outlet details for the pro.
- Consult a licensed electrician for code-compliant fixes.
- Keep all grounding documentation for future safety.